Getting started
Zur Navigation springen
Zur Suche springen
Step 1: Register at the opencaching website to get a free user account

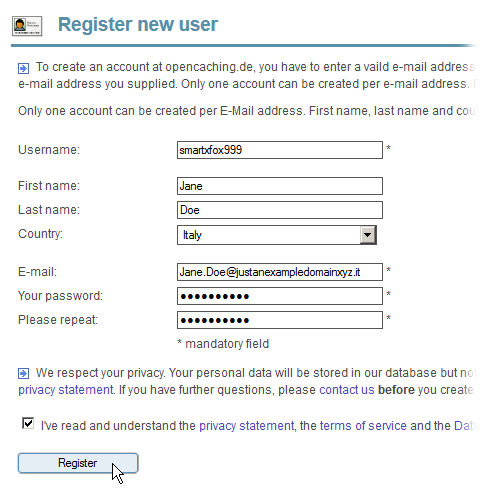
- Open the Opencaching registration form. You may change your preferred language by clicking on one of the flag symbols in the title bar.
- Read the instructions and fill out the form:
- Enter a username: Choose an easy-to-remember user name. This user name will be your nickname in the geocaching community. The user name is displayed in the logs of the geocaches you find, at the listings of your own geocaches and at other places on the website. The system will check the name you chose when submitting the form and display a warning if the username needs to be changed.
- Last name and First name are optional fields. You can use your real name, a nick name or leave the fields blank. Your name is only displayed to our support team.
- Select the country you are in from the drop down menu. If not listed, click "Show all". Country is an optional field. The value is displayed in your public user profile. The system uses the country to search for new caches or recommendations, when displaying the map and at the search and hide caches pages.
- Enter your email address. Remember the email address you used! The system will send you a registration confirmation email to activate your account. If your email address ever changes, remember to update your user profile with the new one.
- Enter a password and repeat the same password in the next field to prevent typos. Choose a strong password with at least 6 characters, e.g. a mix of alphabetical and numeric characters.
- Read the privacy statement, the terms of service and the Data license and check the acknowledgment box to express you understood and agree to the terms.
- Click on the Register button.
- Activate your user account.
- Check your emailbox for an registration confirmation email to activate your account. Click on the link provided in the email to open the activation page, or copy and paste the link into your web browsers address field.
- Type in your email address and your activation code and submit it.
Done!
- If you do not receive the confirmation email some minutes after submitting the form, please check the spam folder of your mailbox.
- If you do not receive the confirmation email even hours later, please contact our support team at kontakt@opencaching.de.
Step 2: Login to the Opencaching website
- If you experience any problems, please, consult the How to log in at the Opencaching website page.

- Click in the top navigation bar on caches.
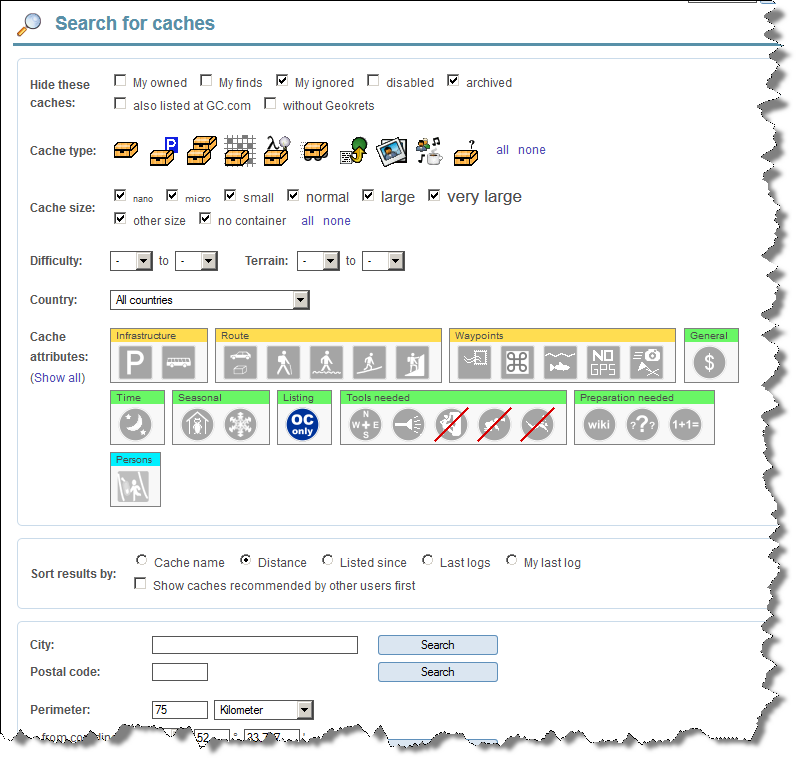
- Select the geocache properties like cache type, size, difficulty and terrain in the top section.
- Click on cache attributes to include or exclude them from your search. Click on "Show all" to display all of them. There are three status: ignore the attribute (grey), geocaches has the attribute (blue), geocaches without the attribute (grey crossed out).
- Coose the results' sort order of your search in the next box Sort results by.
- Scroll down and select on of the options to narrow down your search:
- City: Find geocaches in the town you entered.
- Postal code: Find geocaches in the area of the ZIP code you entered.
- Perimeter: List all geocaches within the search radius around the coordinates.
- Cache name: Find geocaches with specific test in the name.
- Text: Find geocaches with specific text in the description, cache name, picture captions or logs.
- Owner: Find caches hidden by a specific user of the Opencaching websites.
- Log entries: Find all or specific types of log entries written by a specific user of the Opencaching websites.
- All caches: Find all caches according to the properties without any further options.
- Click on the Seach button next to your option to start the search.
There is no case sensitivity of search terms.
Step 4: Prepare for your geocache hunt
- Upload or enter the coordinates of the geocaches from your result list into your GPS receiver. Consult the manual of your device how to do so.
- Pack everything you need for your tour (GPS receiver, spare battery, map, printouts, provisions.
- Find some friends to have fun together. ;-)
Step 5: Seek and find geocaches
Step 6: Log your finds online at the Opencaching website
Step 7: Join the Opencaching community
There are easy ways to join the Opencaching community:
- Have a look at the page About Opencaching.de.
- Join our Opencaching forum.
- Join our Opencaching facebook group.
- Join our Google+ Community.
- Follow us on Twitter.